
This has been taken from Lilyshy’s guide, however it will be updated to be more in-line with re:fresh soon.
Ongeki, stylized as オンゲキ or O.N.G.E.K.I., is an arcade-exclusive rhythm game produced by Sega. It started service in 2018, making it the newest component of Sega’s Performai series of purpose-built rhythm games. The current version, オンゲキ Re:Fresh, sports over 800 songs of various genres such that both rhythm gamers and casual players can find songs that they’ll enjoy.
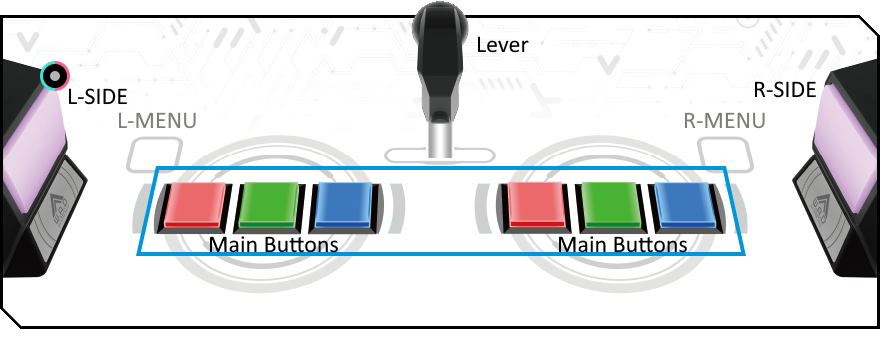
Ongeki’s controller is arguably one of the more unique arcade controllers, with a lever in the middle, six buttons in the middle (three for each hand), and one side button on each side for a total of nine possible inputs. (There is also a button above each of the main buttons, which is used for some menu actions, not for gameplay.)
Gameplay Overview
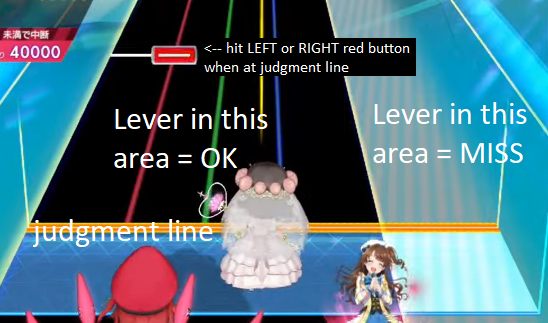
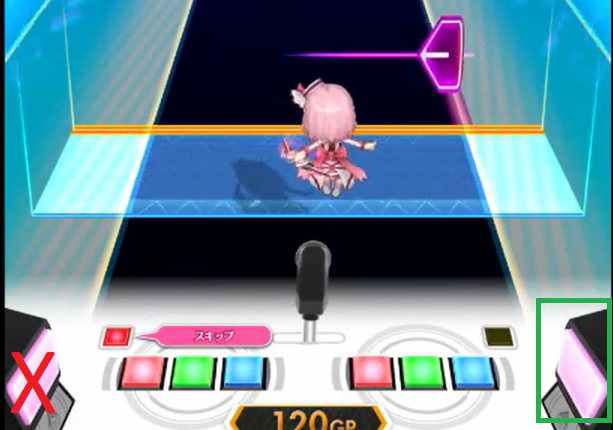
The rhythm game aspect of this game is about as you’d expect in any other rhythm game: when the note hits the judgment line, you hit the corresponding button. What makes Ongeki different is that you must stay within the field (the black part) for your inputs to count.
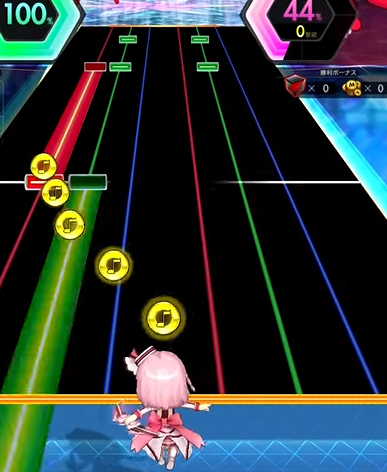
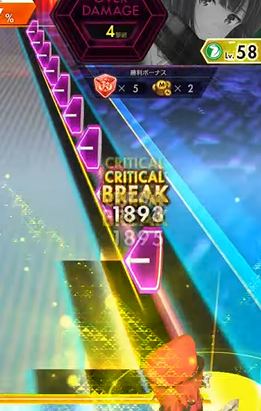
In addition, in a manner similar to bullet hell games like Undertale and Touhou, bullets will enter the field. If you hit them, you will lose health. If your health hits zero, the song ends prematurely and you ‘lose’ the battle.
(Note: This chart is a gimmick chart, where the gimmick is that it’s actual bullet hell. The vast majority of normal charts – except for some upper level 14+/15 charts – do not require you to be particularly good at bullet hell. Even if you need Temmie Armor to beat Undertale, you can do just fine in Ongeki!)
Note Types
Main Buttons
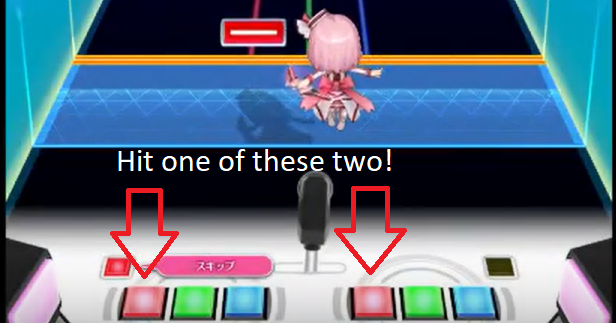
For lack of a better word, this refers to the six main buttons (in two groups of three) to the left and right of the lever. Importantly, you can use either set of main buttons to hit a note. That is to say, if you see a red note coming up, you can hit EITHER the red button to the left of the lever OR the red button to the right of the lever.
In practice, this makes Ongeki a three-key rhythm game at the easier levels. Most players will use their right hand to control the right buttons and their left hand to control the lever (even left-handed players, probably).
These buttons can also be held. It’s like a hold note in any other rhythm game – just hold the button until it’s no longer indicated on screen. Unlike some other rhythm games, you do not need to let go at the end of the hold note. In fact, you probably shouldn’t – there’s no rhythmic benefit and you only risk losing score from letting go too early.
The main buttons have the tightest timing window in Ongeki.
Side Buttons
Ongeki has two side buttons: One on the left and one on the right. These buttons aren’t interchangeable; if the left side button is indicated, you must hit the left side button, and same with the right side.
Like the main buttons, these buttons can be held and do not require you to let go at the end of the hold.
The side button’s timing window is slightly more lenient than the main buttons.
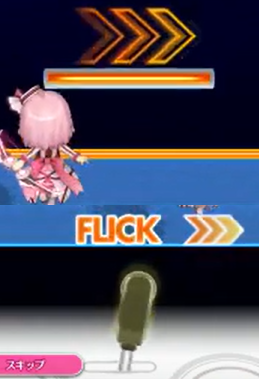
Flick Notes
Flick notes are performed with the lever. If you see an arrow to the right, flick the lever to the right, and same with the left. You can flick the lever in any manner you like – soft, hard (well, don’t slam it), have at it. Just make sure it’s on time.
Two tips with flick notes:
- The location of the flick does not matter. If the flick indicator is on the right-hand side of the chart and your lever is on the left, you can still flick it left and right and it’ll still count.
- Flicks are extremely lenient. Even the tiniest flick to the right will count as a flick to the right and will thus count as hitting the note.
Flick notes have a more lenient timing window than Main and Side inputs and can only be registered as a CRITICAL BREAK or a BREAK.
Critical Notes
Critical notes (or EX-TAP) can appear for the main buttons, side buttons, and flicks. You’ll know they’re there when the note glows yellow:
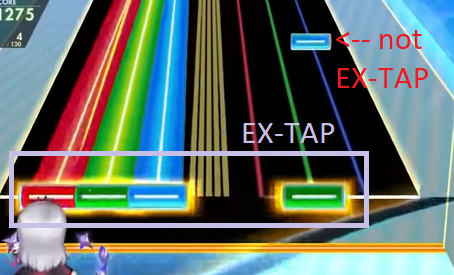
Critical notes have a looser timing window than normal notes and can only be judged as CRITICAL BREAK. However, timing still applies for platinum score. For specific information on Ongeki’s timing windows, go to the Timing Windows section.
Bell Notes
Bell notes are collected using the lever: use it to move your character to where the bell is. It will be collected automatically once the bell hits the judgment line. There is a degree of leniency here – the bell will be sort of “magnetically attracted” to your character within roughly the size of the box shown below.
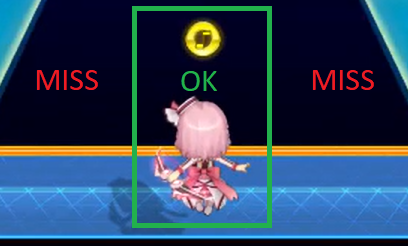
Bell notes will recover around one percent of your health (depending on the chart) up to a maximum of 100%. Even if you don’t need the health boost, you should still aim to collect all of them, since they are part of your technical score.
Damage Notes
You can be damaged by several types of bullets, including:
- Lasers (deals damage continuously while in the laser)
- Purple bell thingies
- Purple bullets
- Orange bullets (deals twice as much damage)
These notes should be avoided using the lever. Hitting one will lower your health down to a minimum of 0%, after which the song will end prematurely, and you will ‘lose’ the battle. Getting hit by a bullet will also drop your technical score by 10 points, making a perfect score impossible if you have been hit once.
Difficulty and Levels
There exist five difficulty levels in Ongeki: Basic (BAS), Advanced (ADV), Expert (EXP), Master (MAS), and Lunatic (LUN). If you have experience with other vertical scrolling rhythm games (like Chunithm or Sound Voltex), you’ll probably want to start off with Advanced or even some lower Expert charts; otherwise, start with Basic.
Normal Ongeki charts are rated from level 1 to 15, and as of writing, one 15+. After level 7, the ratings are also divided up with “+” rating categories as well. (For example, a level 9+ song will generally be harder than a level 9 song, but easier than a level 10 song.)
Lunatic charts are only available for a limited number of songs, with some songs even only being available as Lunatic charts. Ongeki uses this folder for gimmicks, bullet hell, and for charts that are harder than the Master chart of a song. There is no way to tell which is which, except for most gimmick charts being labelled as level 0.
In Bright Memory Act 3, Lunatic charts were further separated into two categories: Lunatic and RE:MASTER. “Fifth difficulty charts” (which are harder than the Master) are recategorized as RE:MASTER, while (most) gimmick and bullet hell charts remain as Lunatic. Some gimmick charts have also been given a rating (for example, My First Phone, which went from level 0 to 14+).
Scoring
Scoring Systems
There are three types of scoring in Ongeki: Battle Score, Technical Score, and Platinum Score.
| Scoring System | Based on | Maximum Score |
| Battle Score | Gacha/card mechanics | Hypothetically infinite, though realistically around 600% – 700% |
| Technical Score | Performance in song | 1,010,000 points |
| Platinum Score | Performance in song (based on PLATINUM/CRITICAL BREAK count) | 2 times the number of notes in the song |
In most cases, you will want to focus on your Technical Score, as that is what is used to calculate the score rank and rating. As of Re:Fresh, you will want to keep platinum score in mind, and as you get better, start to focus on them. They have become more important with the introduction of platinum stars, awarded for timing, up to 5.
Of the 1,010,000 points possible in your technical score, 60,000 points are dedicated to bell notes, while 950,000 points are dedicated to the rest of the notes. 10 points will be deducted any time you take damage.
The judgment values and their value in your score are as follows:
| Judgment | Score Value |
| PLATINUM BREAK* | 100%; 2/2 PLAT. SCORE |
| CRITICAL BREAK | 100%; 1/2 PLAT. SCORE |
| BREAK | 90%; 0/2 PLAT. SCORE |
| HIT | 60% |
| MISS | 0% |
| Missing a bell | You fail to gain** (1/n of 60,000) points, where n is the total number of bells in the song. Also, -2 PLATINUM SCORE |
| Taking damage | You lose 10 points. Also, -2 PLATINUM SCORE |
* Unlike the other judgments (which explicitly display the name of the judgment), PLATINUM BREAK appears as a white glow around a CRITICAL BREAK judgment.
** “Fail to gain” is used here because points are not deducted, since the bell was never collected. Instead, the maximum score you can get decreases. For example, if you are on pace to finish the current song with 985,000 points and you miss 1 out of 100 bells, the maximum score you can obtain because 984,400 (1/100 of 60,000 = 600). If the Battle Retire option is used, then the ‘failure to gain’ will be treated as a deduction, since missing the bell means you are closer to the battle retirement value that you have set.
Because this guide focuses on rhythm-based gameplay, battle score and its mechanics (including “OVER DAMAGE” ranks) will not be covered in detail here.
Technical Score Rank
Your Technical Score determines what score rank you will get:
| Rank | Score |
| SSS+ | 1,007,500 to 1,010,000 |
| SSS | 1,000,000 to 1,007,499 |
| SS | 990,000 to 999,999 |
| S | 970,000 to 989,999 |
| AAA | 940,000 to 969,999 |
| AA | 900,000 to 939,999 |
| A | 850,000 to 899,999 |
| BBB | 800,000 to 849,999 |
| BB | 750,000 to 799,999 |
| B | 700,000 to 749,999 |
| C | 500,000 to 699,999 |
| D | 0 to 499,999 |
Because of Ongeki’s separate battle score and technical score systems, it is possible (and in fact common) to get a “draw” in battle even with good rhythm game performance, making the definition of “clearing” in Ongeki somewhat fluid (like in Chunithm). A general guideline is that a rank of S (970,000) would be considered a “clear” in any other rhythm game, as that is the point where your rating is based on the score constant and not subtracting from it.
Rating and Score Constants
Rating is a numerical measure of your skill. The higher your rating, the ‘better’ you can be considered to be in the game. (Of course, assigning a number to your skill isn’t a hundred percent accurate since different people excel at different things, but it’s better than having nothing to go off of.)
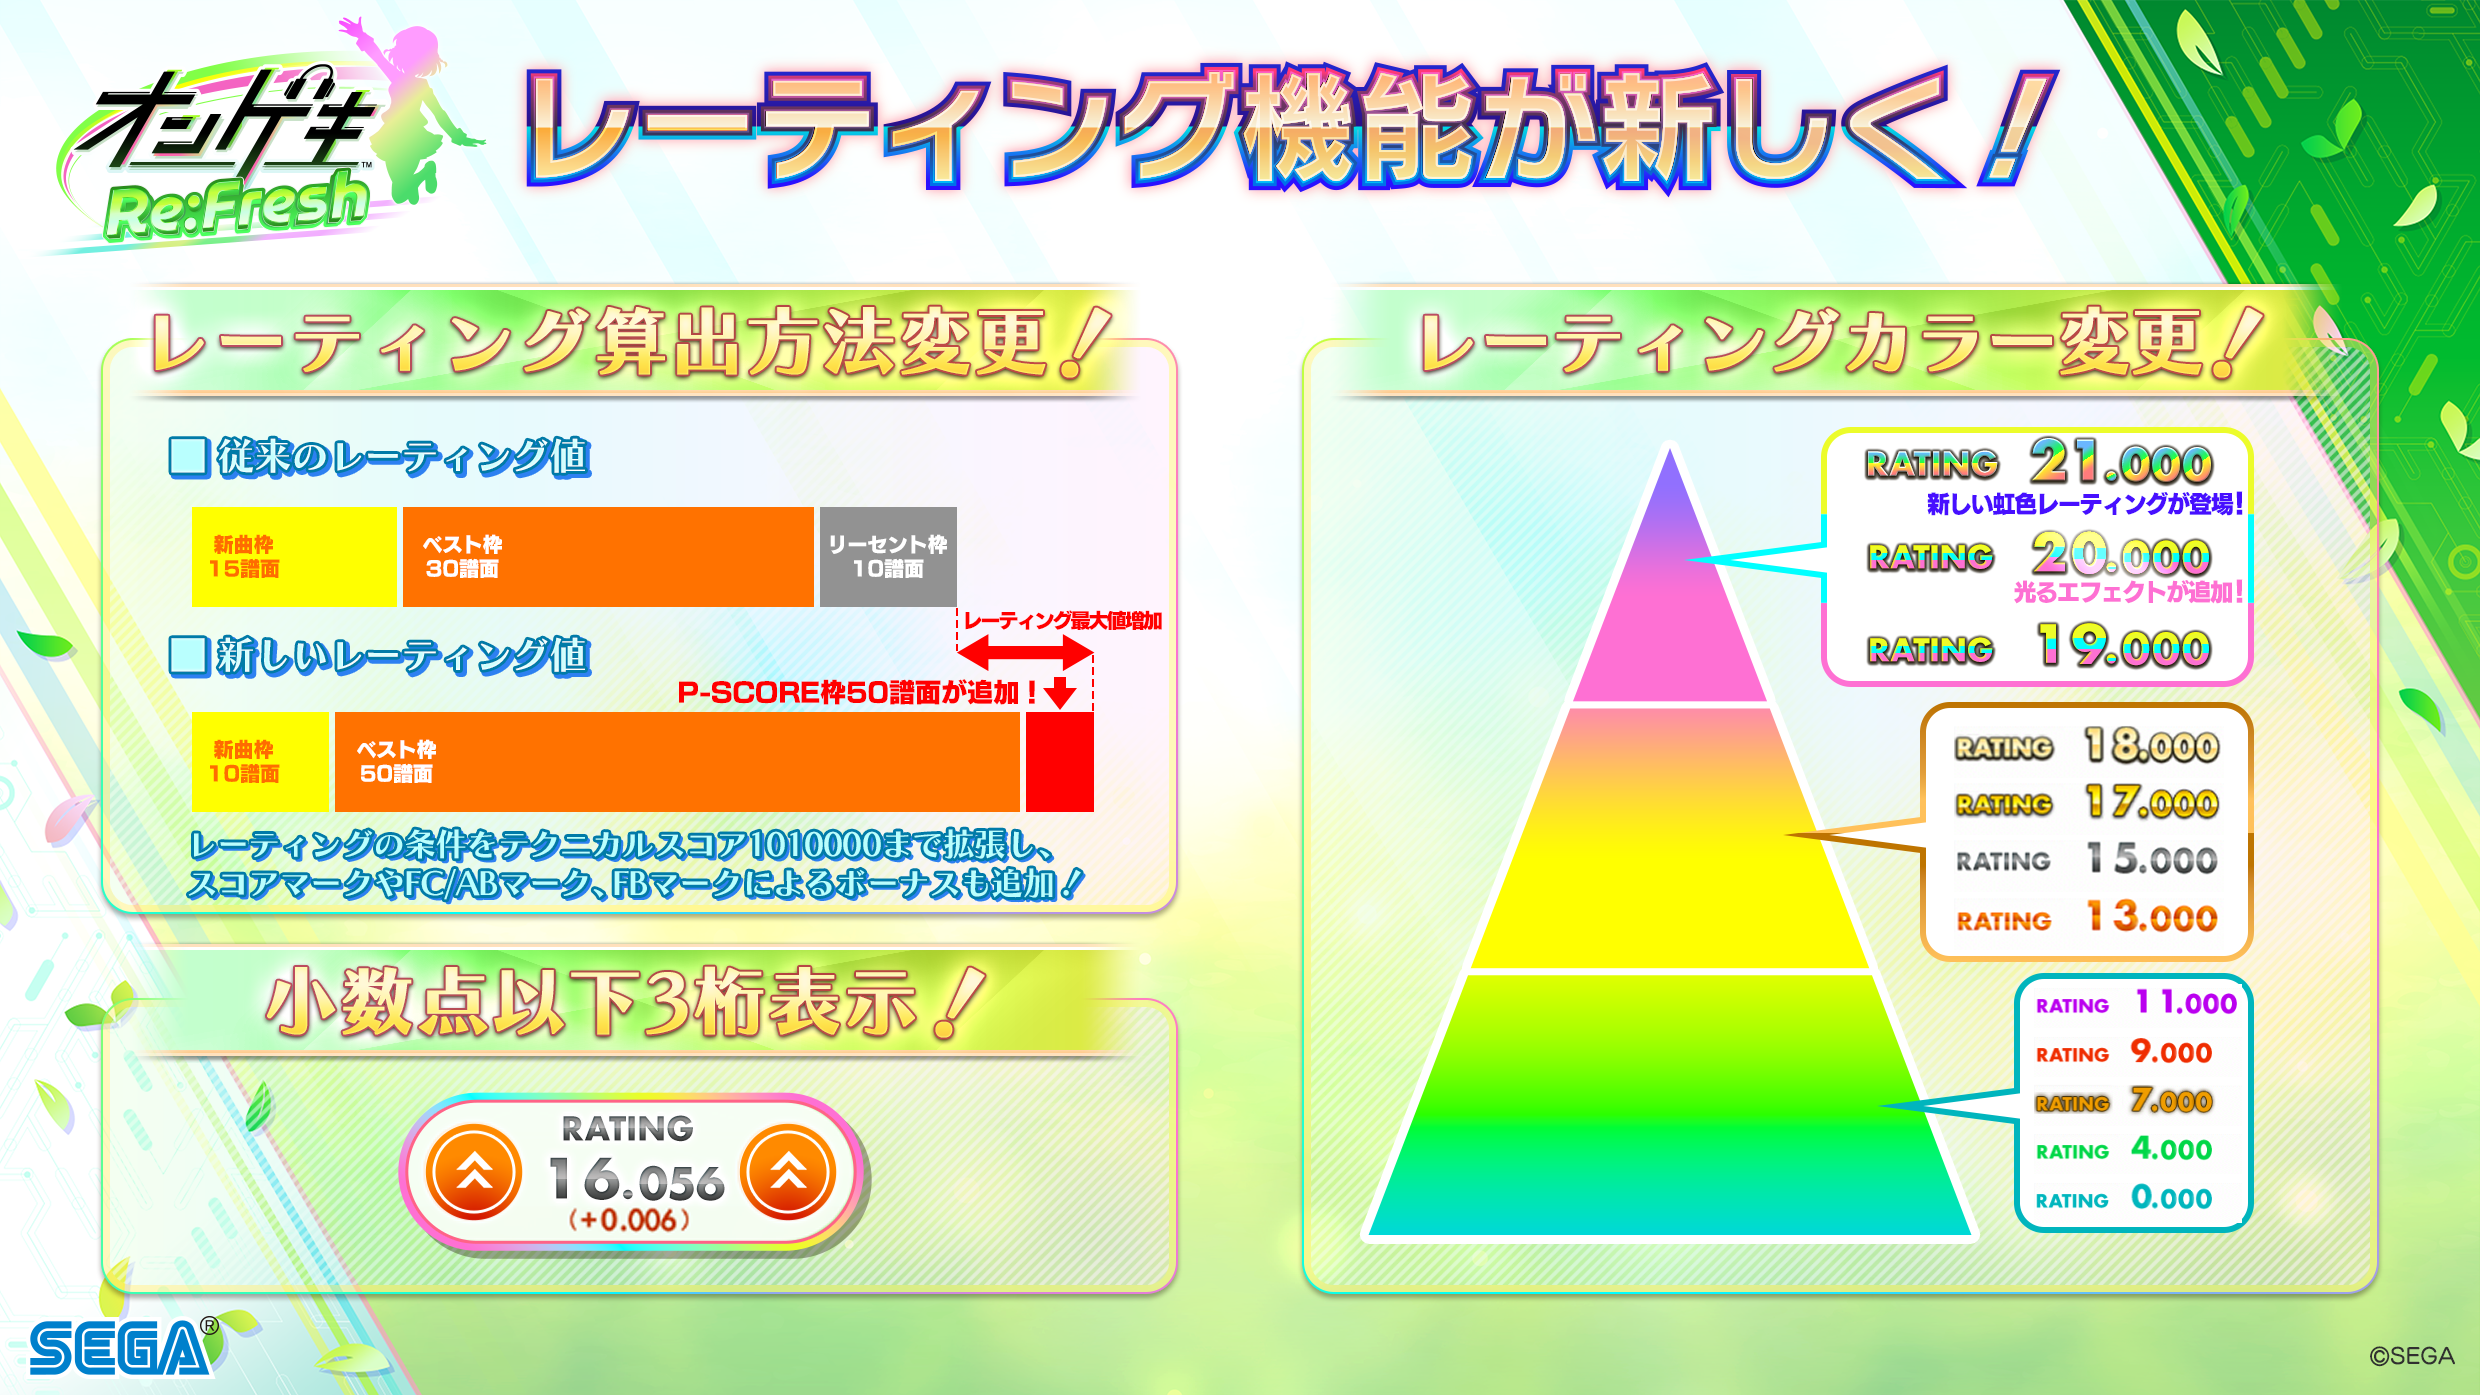
Rating and score constants have been adjusted in Re:Fresh. To learn more about the rating system, check out this translated article: Re:Fresh New Features and Rating changes
Timing Windows
The timing window of notes in Ongeki changes depending on the type of the note. For specific values, check the Ongeki section of this write-up.
TL;DR:
- For normal (main button) notes, the CRITICAL BREAK timing window is +/- 33ms (two frames)
- Note types other than main button notes cannot be judged as HIT, except for dropped holds
- Offsets adjust the timing window by 1.667ms per 0.1 increment
Note: Platinum Break is not visually displayed on difficulties below Master (outside of technical challenge events). In those cases, for practical purposes, the tightest timing window is “Fast Critical Break” and “Slow Critical Break”.
Playing Ongeki
Saving Your Progress
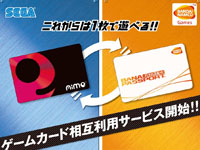
To save your progress, you need to use a compatible IC card. You can use any card that follows the Amusement IC specification, usually indicated by the Amusement IC marking on the front or back (your local arcade most likely sells one):

If you have one on hand, you can also use an old Banapassport or Aime card:
IC cards effectively act as an identifier for your profile, which is loaded from the game’s servers. This means that progress that you make on a Japanese cabinet will not transfer over to a non-Japanese cabinet, or vice versa. The same goes for if you transfer your card to a new one, so make sure not to dispose of any old cards that you might have until all of your data is where you want it.
The GP System
After scanning your card (or playing as a guest), you will be prompted to select how many credits you would like to insert.
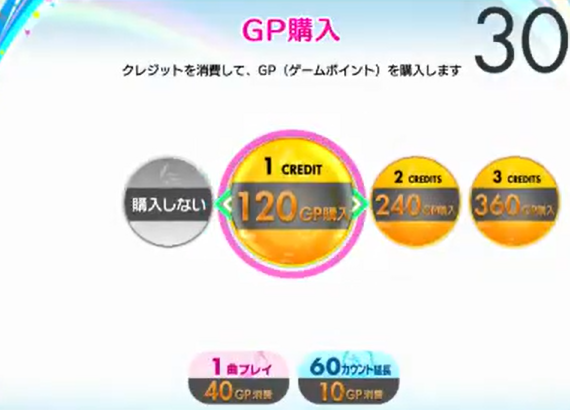
Unlike most rhythm games where you insert a coin and play three or four songs, Ongeki uses the GP (game point) system to distribute song plays. Credits pay for GP, which can be used to pay for song plays, in-game currency, or for in-game progression. The most common costs are as follows:
| Item | Price | Description |
| One song play | 40GP | Play one song, one time. |
| Play Master difficulty | +10GP | Added on top of the “one song play” price. Allows you to play Master difficulty without needing to play the Expert difficulty beforehand. If you get at least an S (970,000) on the Expert or Master difficulty of that song, then Master will be permanently unlocked for that song. |
| 60 additional timer seconds | 10GP | Add 60 seconds to the timer, if you need more time to pick out a song or to do things in the menu (chocolate feeding, gacha card picking, etc.) |
| 2x jewel boost | +40GP | Doubles the number of jewels (and progression) received from the one song play. |
| 3x jewel boost | +80GP | Triples the number of jewels (and progression) received from the one song play. |
| 9x jewel boost | +320GP | Multiplies the number of jewels (and progression) received from the one song play by nine. |
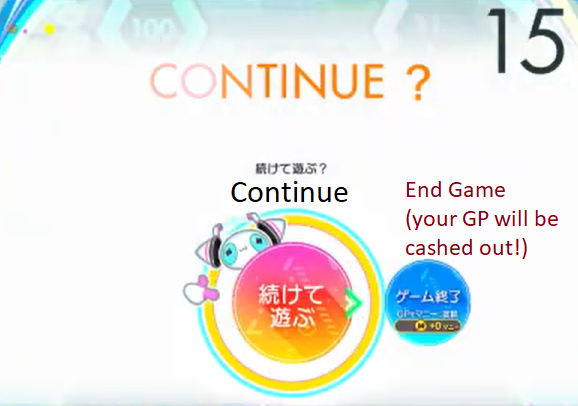
Unlike a conventional rhythm game (where you would play for three songs and then quit), Ongeki will prompt you to continue or end your credit at the end of each song*. If you have leftover GP when you decide to stop playing, it will be converted into in-game currency at a rate of 150 マニー (money) per GP.
* Etiquette Note: Depending on the popularity of the game in your area, the Continue function may be limited so that it is not possible to add credits once your game has started. Due to the nature of the GP system, you should ensure that a queue has not formed when determining whether or not to continue.
In Japan, there are two common pricing schemes for Ongeki, both of which roughly translate to three songs per credit. (One credit is 100 JPY, or traditionally one US dollar in your local currency.) Type B is more common these days. Outside of Japan, credit prices may vary, but Type B is still the most common – check with your local arcade.
| Type A | GP | Type B | GP | |
| 1 credit | 100 | 1 credit | 120 | |
| 2 credits | 230 | 2 credits | 240 | |
| 3 credits | 370 | 3 credits | 360 |
Etiquette Note: Similar to the “Continue” function, you should ensure that a queue has not formed before committing to the 3-credit pricing option. While it may be the cheapest (depending on your cabinet settings), it is rude to hog the cabinet for any longer than 3-4 songs when there are people waiting. (If in doubt, ask around and make verbal agreements with the people currently in the queue.)
Similarly, selecting the 3-credit option when there’s a queue might spook people, so if you’re just buying 3 credits to farm GP or money or whatever (and won’t take any longer than a traditional 3-song credit), it’s nice to let people know.
Menu Controls
The menu controls are displayed on the bottom screen. They may change depending on what screen you’re on, but generally speaking:
- The L-SIDE and R-SIDE buttons are used to move between categories (such as story chapters and song folders).
- The left-side middle and left-side right buttons are used to move within categories (such as between songs and difficulties).
- The right-side left button is used to confirm.
- The left-side left button is used to go back one menu.
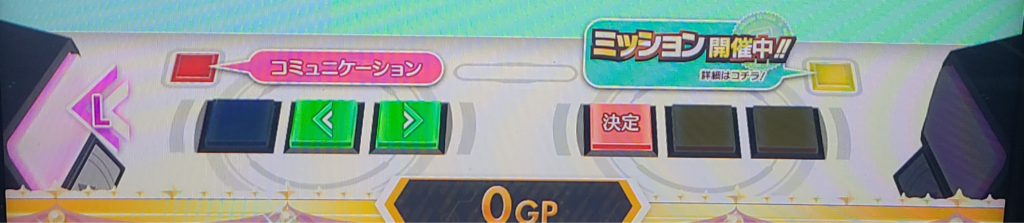
Pictured: Controls when in the chapter selection screen.
Your First Credit
Profile Setup
When you tap your IC card to the reader (located on the top-left hand corner, next to the card slots), you will be automatically prompted to create your profile (or to login if you already have a profile. Otherwise, if you press a button while the game is in Attract Mode (not actively in a credit), you will see this screen:
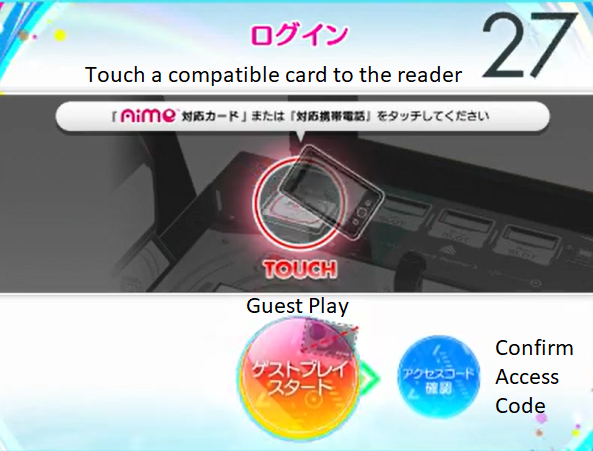
From here, you can either tap your card (if you have one) to create/load your profile, or hit the right-side left button (red) to play in guest mode (where your data won’t be saved). This guide is written with the assumption you’re playing with a card.
If this is your first time playing Ongeki, you will be prompted to set a name. On the official network, you can change your name at any time from the Web UI, so don’t mull for hours over this decision. Elsewhere, you may have to contact your local arcade community for more information. Use the left-side middle and left-side right buttons to switch between letters, the L-SIDE and R-SIDE to switch between categories (e.g. from letters to numbers), and the right-side left button to confirm whatever letter you pick. (These same controls are used throughout the game, so get used to them.) Select END when you’re done.
Now that you’ve created a profile, you’ll be granted 40GP for free, which means you can play one non-Master difficulty song. Any inserted credits won’t be used. You’ll also probably be greeted with a barrage of default card unlocks, which you can get through by continuously pressing the right-side left button. Once done, you will be prompted on whether you want to play the tutorial. (To my knowledge, there isn’t a way to bring up the tutorial after your first few credits, so now would be a good time to play it if the text explanations above weren’t enough.)
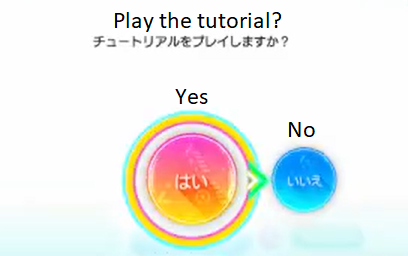
If you hit “Yes”, the tutorial will play, explaining every note type and the general mechanics of the game (including battle mechanics) and making you try them for yourself. If at any time you feel that you get the point of the tutorial, you can press the top-left button (L-MENU, in red) to skip it.
Chapter Selection
Once you’re done with the tutorial, you will be prompted to select a game chapter.
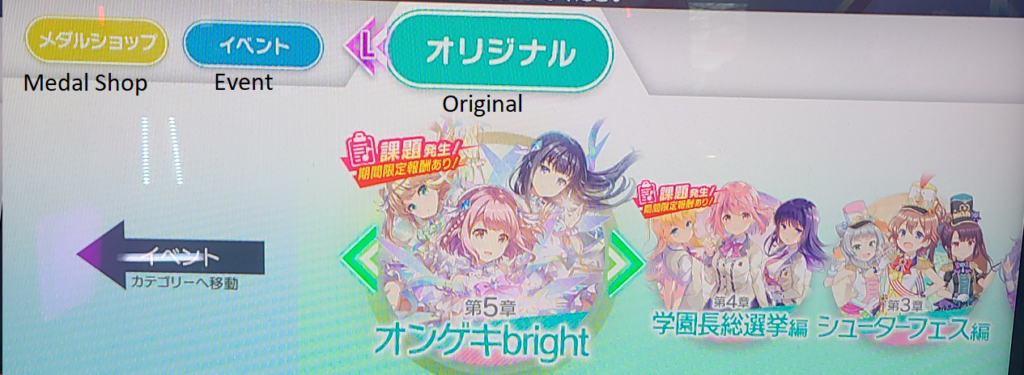
This is a bit similar to the gate selection system in WACCA, the chapter selection system in Chunithm, the map selection system in maimai or the room/food/whatever selection thingy in beatmania IIDX (???) – basically, each chapter has different unlocks (usually for character-related stuff, rather than for songs). In this section of the guide, we won’t go into much detail about it since it’s your first credit. Just pick any of the chapters (other than the medal shop) and continue. (If you ever get stuck anywhere, you can usually hit the left-side left button (blue) to go back to the previous menu.)
Song Selection
Now for the fun part: song selection. By default, Ongeki sorts songs by their genre, which are as follows:
- POPS&ANIME: Japanese pop songs and songs from animation – broadly speaking, “weeb stuff”. This includes things from hololive.
- niconico: Mostly Vocaloid/vocal synthesis-derived music – broadly speaking, “Hatsune Miku stuff”.
- 東方Project: Songs from Touhou (or remixes of songs from it). Stuff like Night of Knights.
- VARIETY: Stuff that doesn’t really fit into the other genres, but generally speaking this includes game music (like stuff from Sonic/Puyo Puyo), rhythm game music (such as collaborations with other arcade/console rhythm games) and BMS (such as osu! original FREEDOM DiVE↓).
- チュウマイ: Original songs from Sega’s other rhythm games, Chunithm and maimai (as in, stuff that was made specifically for those games. Things that fit into the other genres that happen to also be in those games will not be in this category.)
- オンゲキ: Songs original to Ongeki. This is probably where you will find the most “boss songs”, if you’re into that sort of thing.
Give yourself a good thirty seconds to pick a song you like – you’ll need a bit of time to at least configure some barebones settings to make the game playable (such as scroll speed and headphone volume). Once you’ve picked your song, you should see this screen:
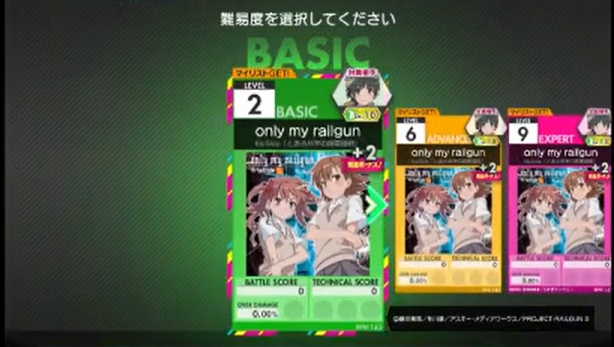
Pick the difficulty of your liking (I’d probably recommend something Level 7 or lower on a first-ever play), then you’ll see this screen:
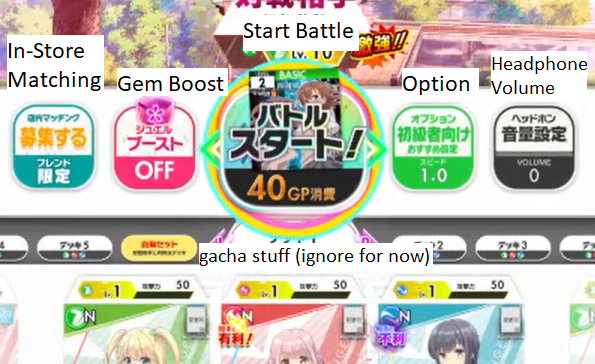
Initial Game Settings
On this screen, you can configure the cards that will be used (for gacha purposes), whether to ‘boost’ the current song, and your game settings. For now, ignore the In-Store Matching and Gem (Jewel) Boost options. Instead, you’ll want to focus your attention on the Option and Headphone Volume sections.
As one would expect, headphone volume changes the sound volume that the game will output to your headphones. You can’t change this anywhere else in-game, but your settings will be retained even if you unplug your headphones. (In other words, be careful not to blast out your ears if you switch between different headphones that have different output volumes.)
When you select the Options… option, you will be greeted with this screen:
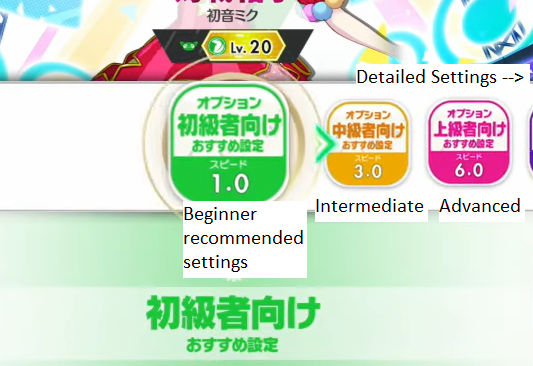
Since we don’t have very much time on this credit (given you’re probably still getting used to menus), I would recommend setting your options to Beginner if you’re new to rhythm games, Intermediate if you have some experience and Advanced if you’re already good at other vertical-scrolling rhythm games. More information on what each of the detailed settings actually does can be found here.
Once you’re ready, hit バトルスタート (Battle Start) and start the game!
After the Song
Once you’re done, the game will end in a win, draw, or loss. A win means you defeated the enemy, a draw means you didn’t defeat the enemy but made it to the end, and a loss means you ran out of health in the middle of the game (and your song thus ended prematurely). Afterwards, the results screen will be displayed. Most of the stats are pretty intuitive (or are gacha-related and thus generally not of concern), but here are some things you might be less familiar with:
- FULL BELL means that all bells (the little golden notes that you have to collect using the lever) in the song were collected
- ALL BREAK means that you didn’t get any MISSes or HITs in your song
- It is still possible to get an ALL BREAK without getting an SSS+ in the song
- Getting all CRITICAL BREAK judgments is referred to as an “ALL BREAK+”, but this isn’t visually displayed in-game outside of the folder’s ALL BREAK count
Take a photo if you want—it’s your first score and you can only ever have one of those, after all. Once you’re ready, continue and you’ll be greeted by this screen:

Depending on your arcade’s settings, you might not actually be able to add any GP at the end of your credit, but you can still take a minute to browse through the song list to look for what you might want to play on your next credit, since you’ll still get the 60-second timer if you hit continue, even with zero GP. (Now might also be a good time to configure your game settings.) Otherwise, go over to End Game to end your game.
If you’re on the song select menu and want to quit out without waiting for the timer to lapse, hold the L-MENU button to cut your credit off early. (There will be a confirmation screen; hit はい to confirm that you want to quit out early.)
Once your game is over, you’ll see how many experience points you’ve earned (not important) and be able to customize your profile (such as the frame displayed around your game, your profile picture and your title). Once you’re ready, hit ゲーム終了 to end your credit. Congratulations – you’ve just finished your first game of Ongeki!
Game Setting Configuration
If you’re a seasoned rhythm game player, the first thing you’ll probably want to do is configure your settings just the way you like them. This section serves as a guide to the detailed settings of Ongeki.
Start by selecting a song so that you can get to the Final Check screen. (You don’t actually have to pick the song you’re selecting, but you probably should in case you spend too much time configuring your settings.) Scroll over to Options, then all the way to the right for the detailed options. It looks like this:
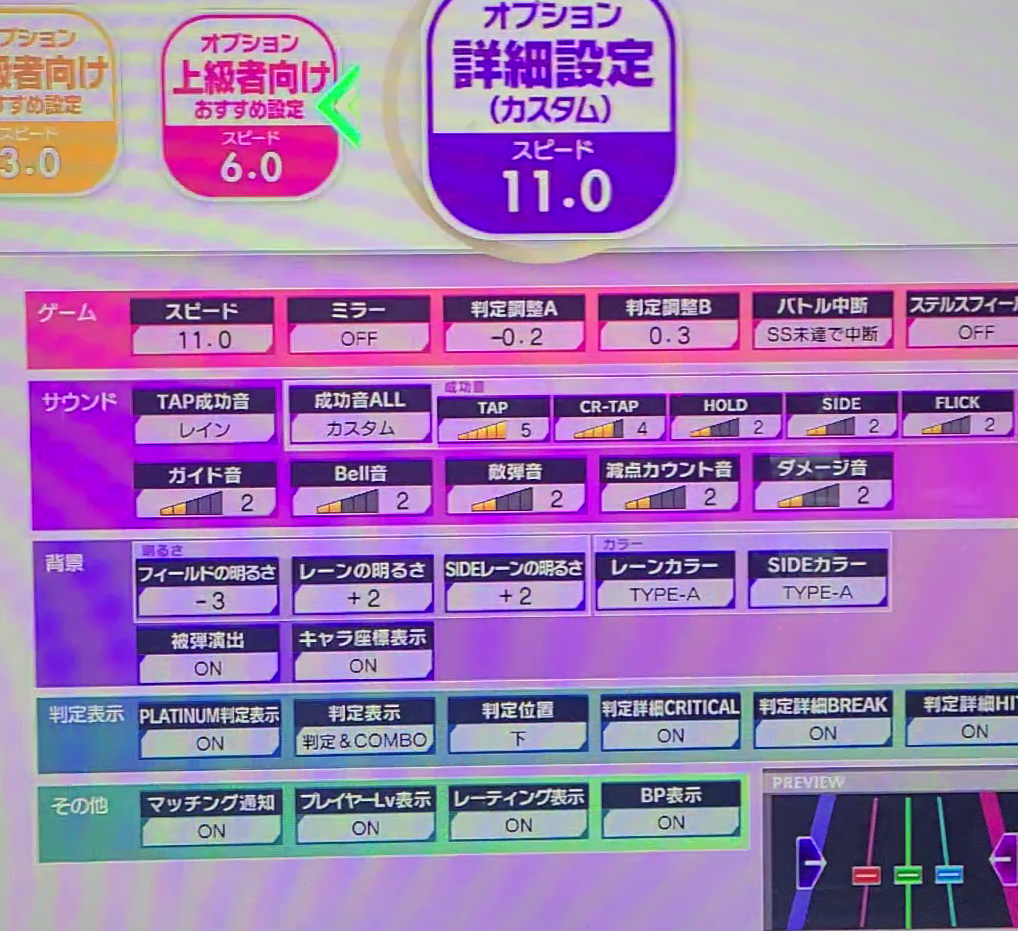
I won’t take screenshots/photos of each category, but just know that you can use the L-SIDE and R-SIDE buttons to navigate between categories if you want to change a specific setting. The categories are as follows:
- ゲーム (Game settings)
- サウンド (Sound settings)
- 背景 (Background settings)
- 判定表示 (Judgment display settings)
- その他 (Other settings)
Let’s go over the options one by one. (By the way, whatever setting within an option says 標準 (in yellow) on it is the default setting for that option, in case you don’t know what a setting does and just want to set it back to the default.)
ゲーム (Game settings)
This is where you configure the core of how the game plays.
- スピード: Scroll speed. You can select any speed between 1.0 and SONIC (20.0), in increments of 0.5 (0.25 in Bright Memory Act 3). Pick whatever’s comfortable for you! The scroll speed used by experienced players in normal gameplay is generally in the range of 10.0 to 13.5. Most gameplay videos will use 10.0.
- ミラー: Mirror mode. Charts will be mirrored with this option. I’m not really sure how Ongeki interprets this, though.
- 判定調整A: Offset A. This is a bit complicated and you’re probably better off reading the explanation in the timing windows write-up, but taken from there: it’s chart offset. You can set this option to anything between negative and positive 2.0 in increments of 0.1, where each 0.1 is one-tenth of a frame (16.66ms). My personal setting is -0.2, but it’ll be different for each person (and may even differ by cabinet or game version).
- 判定調整B: Offset B. Again, see the write-up for a full explanation, but taken from there: it’s judgment offset. Everything technical for offset A goes the same for offset B. My personal setting is +0.3, but again, different for each person.
- バトル中断: Battle suspension/retire. Basically, the battle (game) will end (and the song will end prematurely) if whatever rank you set the battle to suspend at is no longer possible to attain. You can set this to S, SS, or SSS. Basically, don’t touch this unless you’re grinding for rating or a specific score rank or are confident enough in your skills that you can get a specific rank. Annoyingly, this is the only way to display decreasing (minus-type) score in Ongeki, as when this option is enabled, you can see how many points you are from having the battle end early while in-game.
- ステルスフィールド: Stealth field mode. The field (the black backdrop of the notes that your character has to be within in order for any inputs to count) is hidden from view, so you won’t know for sure what part of the field will count as a valid input and what won’t (since, remember, having your lever outside of the field means you can’t perform any inputs). Only ever enable this if you want to challenge yourself.
サウンド (Sound settings)
This is where you configure how the game sounds. For example, if a sound is distracting because of its volume, you can lower it, or if a sound isn’t loud enough, you can raise it. Sounds can be set between zero (off) and five – if you need a sound to be any louder, turn up your headphone volume and/or turn the other sound options lower.
- TAP成功音:Hitsound – basically, the sound that plays whenever you hit a note successfully. You have a few options (my personal favourite is レイン):
- オンゲキ (Ongeki): Ongeki’s default hitsound
- チュウニ (Chunithm): The default hitsound from Chunithm
- マイマイ (maimai): The default hitsound from maimai
- ウッドブロック: Woodblock
- クラップ: Clap (like, a hand clapping)
- レイン: Rain (like, raindrops)
- ベル: Bell (closer to a tambourine, honestly)
- キック&ジャンプ: Kick and jump (really more of a bass drum hit)
- 成功音(ALL): Success hitsound for all possible sound effects. Changing this setting will automatically set the rest of your sound settings to whatever volume you pick (no confirmation), while カスタム indicates that you have unequal settings somewhere (for example, your SIDE sound might be quieter than your TAP sound).
- TAP, CR-TAP, HOLD, SIDE, FLICK, BELL音: Sound volume for each note type, respectively.
- ガイド音: Sound volume for guide sounds. Whenever a note passes the judgment line, it’ll play a guide sound (a click sound similar to the ‘wood’ hitsound), regardless of whether you hit the note or not. In Bright Memory Act 3, you can turn this setting up to 10, making it louder than other sound effects.
- 敵弾音: Sound volume for enemy bullet sounds (a sound that plays when a bullet passes the judgment line).
- 減点カウント音: The score deduction count sound – or, put another way, an audible indicator for whenever you hit anything other than a PLATINUM/CRITICAL BREAK. This only applies if the Battle Retire game setting is enabled. This is probably a good setting to turn up if you’re aiming for good accuracy.
- ダメージ音: Sound volume for the sound that plays whenever you get damaged by a bullet/laser/whatever.
背景 (Background settings)
This is where you configure things like the colours that display or how bright the game is.
- フィールドの明るさ: Field brightness – how bright (or dark) the field (the black part that you have to stay in for your notes to count) is. Goes from negative five to zero.
- レーンの明るさ: Lane brightness – every main button note is contained on a lane of that note’s colour, so this controls its brightness. Goes from negative three to positive three.
- SIDEレーンの明るさ: Side lane brightness – same thing as the above, but for the side buttons.
- レーンカラー: Main button colour options. You can actually change the colour order of the coloured lanes (the default is red-green-blue, but you might want it as something else). This doesn’t change the chart, just the colouring. Possibilities:
- Type A (red-green-blue, default)
- Type B (red-blue-green)
- Type C (green-red-blue)
- Type D (green-blue-red)
- Type E (blue-red-green)
- Type F (blue-green-red)
- 色覚サポート (Colourblind support, making it easier to differentiate between note colours if you are certain types of colourblind)
- SIDEカラー: Side button colour options. A bit less exciting here:
- Type A (purple-left pink-right, default)
- Type B (pink-left purple-right)
- Type C (both pink)
- Type D (both purple)
- 被弾演出: Toggles the red visual effect that appears when you get hit by something
- キャラ座標表示: Character line display – choose whether the line displaying where the character is on the field is displayed.
判定表示 (Judge display settings)
This is where you decide what judgments (e.g. CRITICAL BREAK, BREAK) are displayed or how they are displayed.
- PLATINUM判定表示: PLATINUM BREAK judgment display. Determines whether the glow around a CRITICAL BREAK note (indicating a PLATINUM BREAK) will display or not. Does nothing on non-Master difficulties.
- 判定表示: Judgment display. Determines what will be displayed whenever you hit a note. Your options are 判定 & COMBO (display both judgment and combo), 判定 (judgment only), COMBO (combo only), and OFF (display neither).
- 判定位置:Judgment position. Determines where the judgment will be displayed whenever you hit a note. Your options are:
- 下 (under the note)
- 中 (middle, on the note – default)
- 上 (above the note)
- 天 (higher than above the note)
- 天上 (even higher than above the note)
- 判定詳細CRITICAL, BREAK, HIT: Detailed judgment for CRITICAL, BREAK, and HIT. Determines whether FAST/SLOW will be displayed for these inputs.
その他 (Other settings)
These are the other settings that don’t apply in the other categories. In practice, it’s mostly used to show or hide profile elements while playing.
- マッチング通知: Matching notification. Determines whether to notify other players that you are available for local matching. (This will do nothing if there is only one cabinet at your location.)
- プレイヤーLv表示: Player level display. Determines whether to display your level in the top-left profile card that displays during gameplay.
- レーティング表示: Rating display. Determines whether to display your rating in the top-left profile card that displays during gameplay.
- BP表示: BP (Battle Point) display. Determines whether to display your battle rank thing in the top-left profile card that displays during gameplay.
Advanced Song Sorting
If you’re looking for a specific song or are grinding for songs but the default sorting is too inconvenient, Ongeki offers a few options to change your sort order. You can access them by hitting the R-MENU button (yellow, marked ソート on-screen) while in the song selection screen. You should see this screen:
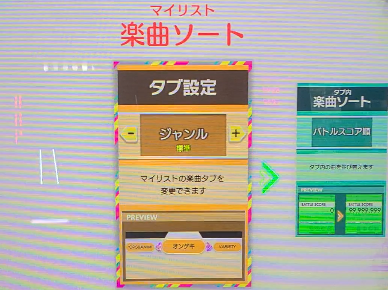
The first of these options, in yellow, changes the folders that songs are in. By default, this is set to genres, but you can set it to one of the following:
- ジャンル (Genre)
- 全曲 (All songs in one folder)
- キャラクター (Character that you will be battling)
- バージョン (Version of Ongeki that the song was released in)
- 譜面レベル (Song difficulty level, from 1 to 15+)
- 名曲 (The name of the song – for example, songs starting with あ or songs starting with a letter between and including A to G)
- 属性 (Element of the character, I think… like, gacha colour stuff, like the fire/water/grass stuff)
The second of these options, in green, changes the order of songs within each folder. By default, this is set to some bespoke (potentially based on song release date?) “recommended” order, but you can set it to one of the following:
- おすすめ順: Recommended order (just… the default order that Sega decided)
- バトルスコア順: Battle score order (Your best battle scores, where the song at the end of the list is has your highest battle score and the song(s) at the beginning of the list are your lowest)
- テクニカルスコア順: Technical score order (Your best technical scores, where the song at the end of the list has your highest technical score and the song(s) at the beginning of the list are your lowest)
- 対戦相手のLv順: Opponent level order (The level of the opponent in battle, where the highest level is at the end of the list)
- 名曲順: Title order (Basically, true alphabetical order when used in conjunction with the 名曲 folder/tab setting)
The final option, in purple, only applies if you have in-game rivals, which you can only have if you’re playing in Japan and pay for Sega’s monthly WebUI subscription. In such cases, you can display your rivals’ battle (バトル) or technical (テクニカル) score.
Other Mechanics
Running out of time
When you run out of menu time in Ongeki, you will see a screen asking you if you want to pay 10GP to add 60 seconds to the timer. If you hit “No/しない(?)” (or just let the timer reach zero), your GP won’t be forfeited – instead, the game will attempt to start the song that you currently have selected (or are hovered on). As long as you have sufficient GP, the song will play, and you can keep going after the song is over. If you don’t, you’ll be prompted to buy more GP, and if you decline, then your remaining GP (if any) will be cashed out and your credit will end.
Folder badges
In Ongeki, you will receive a badge on a folder if you achieve the badge for that item in every song in the folder.
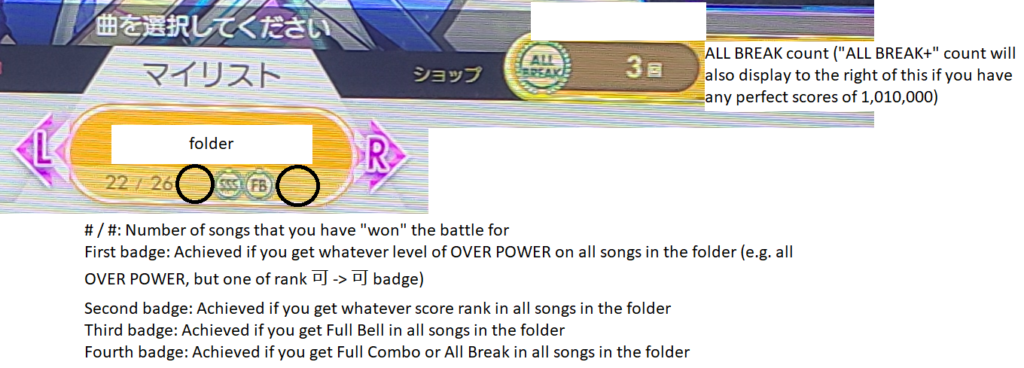
Note: The ALL BREAK / ALL BREAK+ count is cumulative within the folder, NOT a count of how many charts within the folder you have AB/AB+’ed. If you get an ALL BREAK on 君のStarlight Road 500 times, you’ll be shown an ALL BREAK count of 500回 plus however many times you’ve ALL BREAK’ed other stuff within that folder.
Special Titles
You can generally get a title for doing one of the following, which you can display above your name in your profile:
- Getting ABFB in all charts of a song
- Getting ABFB in any Lunatic chart
- Giving the Ongeki girls a lot of gifts
A full list of available titles is available here. The available “ranks” of titles are:
- Normal (default / trivial to get)
- E.g. Play Ongeki once
- Silver (beginner / easy to get)
- E.g. Rating 10.00
- Gold (intermediate / a little hard to get)
- E.g. Rating 14.00
- Platinum (advanced / hard to get)
- E.g. Rating 15.00, ABFB on LUNATIC
- Rainbow (master / extremely hard to get)
- E.g. Rating 17.00, character level 900
Going for Rainbow
If you’ve been getting past the Beginner stage of Ongeki and want to aim for something that puts you into “competitive” range, you’ll want to go for a rating of 15.00. Ongeki rewards you for attaining this rating by giving you a shiny platinum title celebrating your achievement and, more importantly, by making your rating show a rainbow gradient.
But how exactly do you go about doing that?
Scroll Speed
At this stage, you’ll probably want to start using a faster scroll speed for a few reasons:
- It’s typically mentally easier to time, since the notes aren’t appearing as long, making you rely more on the rhythm rather than the visuals
- Notes will become more dense at this stage, so increasing scroll speed decreases the density and thus makes them easier to read.
- It looks more impressive! 😉
ABFB videos (basically the equivalent of 全良 videos in Taiko or ALL JUSTICE videos in Chunithm) tend to use a scroll speed of 10.0, so I would recommend having that as a minimum. If you can’t read that quickly yet, don’t worry! Just start at a slower scroll speed and slowly work your way up by increasing the speed by one increment every once in a while.
Ongeki is Actually 6-Key
On Master charts, six-key rhythm gaming (using both sides of main buttons simultaneously) becomes common, so there will be many more situations where you’re holding one set of buttons and told to do an input with the other. When you start out, you’ll probably be using your right hand for the buttons and your hand for the lever most of the time. This will most likely remain your default even as you get better at the game, but on higher difficulties the two ‘identical’ 3-key lanes are actually treated as two separate lanes, turning Ongeki into a six (but really, eight… and a half…) key rhythm game.
Hand-Switching
Up until now, you’ve probably been mostly using your right hand to control the main buttons and your left hand to control the lever. However, at this level, you’ll start to encounter situations where you’ll need your left hand to control the main buttons and your right hand to control the lever. Expert and Master charts will naturally push you towards doing this.
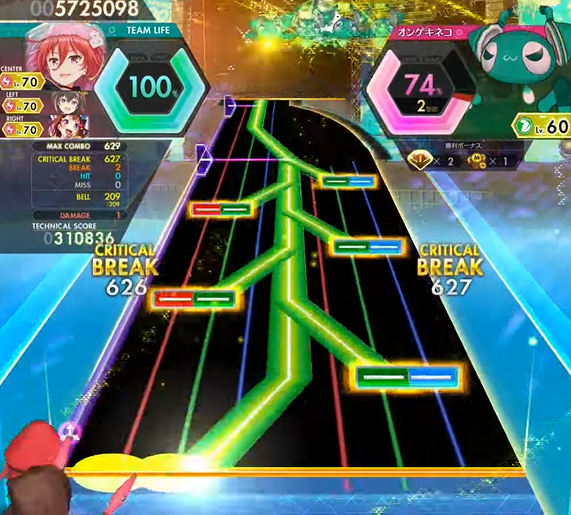
Separating Bell from Notes
At this level, you’ll probably start to notice that there are more and more bells that diverge from where the notes are, or parts where you’re actively doing something with one hand but have to collect bells with the lever on the other:
Thus, you’re going to need to try to mentally separate the two. Keep in mind that Ongeki will never have you do something that is physically impossible, so if something seems impossible, it might be useful to look for a hand-cam video of someone performing that movement.
Maintaining Holds
On higher difficulties, you’ll probably start to encounter patterns like this:
(Don’t worry, it won’t actually be that complicated in the 13/13+ range.)
It’s important to recognize that you only need to hold one button of that colour to maintain a hold. In the above example, when that last green-blue group hits, your left hand will be free to hit L-SIDE and you just need to CONTINUE TO HOLD the green button with your right hand. This will come up more and more as you play harder and harder songs, so get used to the idea now.
(Specifically, if you press both buttons simultaneously, you can release either one – most likely this will be the one that will be more convenient for the next input, whether that be on the left or right. If it’s not simultaneous, as seen here, you most likely only be allowed to let go of the LEFT GREEN button, since the RIGHT GREEN button is the last input that was made.)
Advanced: Beyond Rainbow
Note: This section could use some improvement! If there are any specific patterns you don’t know how to do, let me know and I can try to write about it.
Middle Empty Note
At this stage, you’ll be getting more and more fast sequences like this:

If you try to do this with one hand (like, thumb on red note, pinky on blue note, middle fingers for green kind of like some sort of bird) you are likely to get a bunch of BREAKs and HITs. Often times, the game won’t have anything to do with your other hand at this point, so you can use something like your right hand for the red and blue notes and your left hand for the green notes (alternating).
I find it really easy to accidentally press the middle note when the middle note is missing, which will normally trigger a BREAK or a HIT. So, be really careful about what buttons you’re pressing.
Side Button Jacks
A few special charts require jacks (rapid single-button presses) with the side button. For the most part, it will be slow enough or short enough that you should be able to manage with some practice, with the sole exception of エータ・ベータ・イータ:
When it’s this fast, you’ll need to use both your left and right hand on the side button, alternating them. What I try to do is have my left hand on the top part and my right hand on the bottom part, but I can’t personally get it consistently. (By the way, this specific pattern is sixteenth notes.)
Crossover
Xevel has a couple of fun parts where, if you do them normally, your arms will probably cross over the controller in an “X”. As far as I can tell, while uncomfortable, this is the intended way to play the chart. The same goes for シャッキーーン!!.
What about bullet hell?
It’ll definitely be helpful to be good at bullet hell, but again, not strictly necessary.
Broadly speaking, you can still get reasonably far in the game even if you’re hopeless at bullet hell (like I am). (Also, there’s an SSR guard card that lowers your damage so much that clearing these charts likely becomes trivial – Look for it in the Memory chapters)
Bullet Hell / Guard Guide
Sinnoh wrote a guide about how guard cards / damage works, which you can find here. Highly recommended if there are songs you are stuck at because of bullets, or if you want to clear one of the Lunatic bullet hell charts for rating.